Monday, March 30, 2009

ArcPad Tips & Tricks #2: Multiple layer definitions

Did you know that the AXF file format supports multiple layer definitions for a single feature class? This works in the same way as Layer files in ArcMap: the layer defines the symbology, which points to a feature class, which stores all of the data (both spatial and attributes). To set this up in ArcPad:
  1. Open the AXF in ArcPad studio
  2. Expand the Feature Tables node
  3. Right click on the table you wish to create the layer definition for, and select "Create New Layer". A new layer definition is added to the Feature Layers node
  4. You can rename the layer to whatever you like

And how is this useful I hear you ask. Well, a couple of ideas are:

  1. You could create different edit forms for different purposes. For example, you may have a layer for new features that are collected, and one for follow up inspections. You can specify different forms to ensure the correct fields are filled out in each inspection.
  2. You can combine the layer definitions with filters to create more complex symbology. For example, you may wish to categorise your roads layer into suburban roads, major roads and highways, and display them at different zoom scales.

Wednesday, March 25, 2009

ArcPad Tips & Tricks #1: Layer Icons


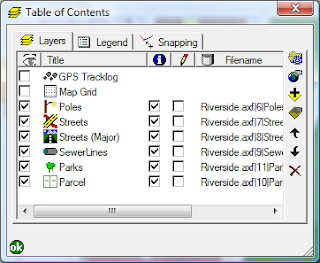
Did you know that you can set icons for your layers. These will appear in the Table of Contents and the Edit drop down menu, making it easier to differentiate between your layers.


For shapefiles, all you need to do is copy a .ico file, with the same base name as the shapefile, into the same directory. So, for example, if your shapefile is Roads.shp, name you .ico file Roads.ico.

The process is a bit more complicated with AXF files. You need to open up the axf in Application Builder, right click the layer and select "Set Layer Icon". You can clear the icon by selecting "Clear Layer Icon".

A good selection of sample icons can be found in C:\Program Files\ArcPad 7.1\Samples\Layer Icons. If you want to make your own, a good program is IcoFX. Your icons need to be 4bit 16x16 images.

Tuesday, March 17, 2009

Behind the Scenes Technical Assistance

In the wake of the recent Victorian Bushfires, behind the scenes, staff from RIA Mobile GIS have been providing technical assistance to MapTel, to support the Victorian Police Search and Rescue efforts.

For further information read the post ArcPad 8 - Victorian Bushfires 2009 on the MapTel Blog.

Monday, March 16, 2009

Mobile GIS Image Capture

There are a number of different hardware options to choose between for image capture within your Mobile GIS System. The competing priorities of specifications, cost and usability are balanced to determine the choice made by the user. Here is a table listing some of the typical units used for Mobile GIS applications and their respective camera specifications:


IPAQ 612c Business Messenger
· Reasonably priced non-rugged unit with PDA/GPS/Phone, suited to users requiring an all inclusive device.
· Typical applications include
Asset Management: recording and monitoring assets in urban streetscapes

TDS Nomad 800LC*
· Rugged (IP67 rating) all inclusive PDA/GPS/Camera unit with long battery life, suited for tough outdoor environments
· Typical applications include
Asset Management: street/pavement inspection, maintenance and repairs
Environmental Monitoring: Tree inventories, pest control, weed management

* Now also available in the 800XC model, which includes all the 800LC specifications in addition to GPRS and 2GB Flash Storage. Contact RIA Mobile GIS for more information.

RICOH Caplio 500SEW Camera
· Rugged (IP67 rating), stand alone camera that can be utilised for a wide range of applications. BT/WiFi included, allowing easy connection to your Mobile GIS System and transfer of images in the field. RICOH clip on GPS module or Digital compass/GPS module also available. Includes CALS mode which has default settings where captured images are suitable to be submitted for official public works.
· Typical applications include
Asset management: Construction/Engineering firms recording images of defects
Insurance Companies: Image records for insurance claims

Friday, March 6, 2009

RIA Mobile GIS Expands Training Courses

RIA Mobile GIS now offers an expanded range of Training Courses.

These courses are designed to assist organisations and users achieve the most from their Field Project. The courses are designed to encompass both the Field and Office (Desktop) components of a field based project as well as cover the integration between these components.

The Mobile/Field based courses are:

  • Using ArcPad - 1 day course providing a functional overview and hands on experience using ArcPad and associated hardware.
  • ArcPad Application Builder - 1 day course providing a functional overview of how ArcPad Studio can be used to customise ArcPad and extend its’ capabilities.

RIA Mobile GIS is an ESRI accredited trainer authorised to provide ArcPad training courses. We are the developers of the ArcPad and ArcPad Application Builder courses run throughout Australia and New Zealand.

The Desktop/Office based courses are:

  • Introduction to ArcGIS - 2 day robust course providing a conceptual overview and hands-on experience using ArcGIS Desktop software.
  • Using GeoDatabases - 1 day course providing an overview and hands-on experience using the ArcGIS GeoDatabase format.

All Courses are offered as either Standard Scheduled Courses, or Client Requested Onsite Courses.

Please note that our training options will be further expanded, updated and refined over the coming months with the impending release of ArcPad 8, which is due out shortly.

Friday, February 27, 2009

ArcPad 8 is on its way!


ESRI has announced that ArcPad 8 will be released in the first quater of 2009. The new version will see an entirely revamped user interface, featureing an Office 2007 type feel with ribbons and quick launch toolbars. As a bonus, ArcPad Application Builder, the development framework for ArcPad, will be included with every ArcPad 8 license.

Other highlights of the new release include:
  • An ArcGIS Server Extension to allow direct synchronisation to ArcGIS Server from ArcPad
  • An improved, more intuitive GPS interface that takes up less screen real estate
  • An enhanced ArcPad Data Manager Extension, which will simplify the process of checking data out and in of the Geodatabase.
If you have any questions at all about the new release, training (for both ArcPad and Application Builder), give us a call on 03 6223 4919.


Stay tuned for further updates regarding the release date and pricing structure.

Friday, February 6, 2009

Mobile Printing


Printing from a PDA usually meant connecting it to a desktop PC and sending files to the local printer. This meant it was hard when you are out in the field.

We have been testing with a Zebra mobile printer with great success. You can print directly from ArcPad to a printer which is small enough to fit on your belt. These types of printers are great for receipts, barcode or reports. You could have an inspection receipt containing data you have just collected to leave with the landholder or print custom reports with barcodes to aid with evidence collection while in the field. The list of possibility is endless.

The downside to this is the print area, the one we currently have uses a 2 inch thermal roll (similar to a fax machine), but there are wider ones available. It is powered by a Lithium-Ion rechargeable battery and utilises Bluetooth for communications. You can find more information at the Zebra MZ-220 here.


Please contact RIA Mobile GIS for further information on how to integrate mobile printing into your Mobile GIS system.

Tuesday, January 6, 2009

Rugged and Non-Rugged Field Units

Due to the nature of fieldwork, Mobile GIS hardware is often subject to harsh treatment from the elements and accidental knocks by users. For this reason ruggedized mobile devices are becoming an increasingly popular choice amongst Mobile GIS users.

There are a variety of mobile devices that come in a rugged format, which are classified with an International Protection code for enclosures (IP Rating). An explanation of the IP Rating classification system can be found at the Wikipedia webpage: http://en.wikipedia.org/wiki/IP_Code

Examples of rugged units include:
- Rugged Field PDA Units: TDS Nomad Series
- Rugged UMPC/Tablet Units: Getac E100, Xplore series
- Rugged Laptop Units: Panasonic Toughbook
- Rugged Digital Cameras: RICOH Caplio 500SE

An additional option available to users is to purchase a non-rugged unit and then a separate enclosure/case that will ruggedize your device for fieldwork. Cases produced by manufacturers such as Otterbox can transform standard mobile devices to droppable, dustproof, waterproof units at a fraction of the cost of purchasing a fully ruggedized unit.

Please contact RIA Mobile GIS for further information on the purchase and optimisation of your Mobile GIS System.

Tuesday, December 23, 2008

How can I "stake out" points in ArcPad?

On many handhled GPS devices, you have the ability to "stake out" a point of interest. For example, you may know that you want to navigate to the nearest ice-cream store that has MGA94 coordinates of 527,105 5,251,855. How do you do this in ArcPad I hear you ask?

  1. Use the Find tool, and switch to the Location Tab.
  2. Make sure you change the coordinate system to what your coordinates are in (in this case MGA 94)
  3. Enter the coordinates of the location, specify the label on the map
  4. Click OK. The mark will be added to your map.
  5. Activate your GPS, open the GPS position window, and you will be given a bearing and a distance to travel in to reach your destination.

GPS Tracklog - Tips and Tricks

In recent times we have had a lot of queries about the GPS Tracklog in ArcPad - how it works, when it gets created, etc. etc. Here is a brief summary of things you should know.

How is it stored?
The GPS tracklog is stored as a point shapefile. Each point contains information such as the time, coordinates and quality estimates. ArcPad represents this shapefile as a line layer, which is what you see in the map when it is turned on.

Where is it stored?
By default, the GPS Tracklog is stored in My Documents. You can alter this from the GPS Tracklog Layer Properties, which can be accessed via the table of contents in the same way as any other layer.

When is the tracklog created?
The GPS tracklog is created when it is needed. If the shapefile is not present and the tracklog is turned on, it will automatically be created.

How do I start tracking?
Select Tracklog from the GPS drop down menu when your GPS is activated.

How do I clear the tracklog?
Stopped for a coffe and need to hide it from the boss? You can clear the Tracklog by clicking the Clear button from the Layer Properties of the Tracklog layer.

Can the tracklog log without showing in my map?
Yes. Open the Table of Contents, and you can toggle the visibility of the tracklog. Behind the scenes, ArcPad will keep logging positions.

What can I do with the tracklog at the end of the day?
As the tracklog is a shapefile, you can copy it off the device and store it back in the office. You could even create a Geodatabase, and store each day's log in there.

Tuesday, December 16, 2008

What is the RMS Error?

The Root Mean Square (RMS) Error is an important parameter which is frequently used in GIS. The RMSE is used as an indictor of the accuracy of the spatial analysis and/or remote sensing.

The RMSE is a measure of the differences between the predicted or calculated values and the actual, or observed/measured, value. Each individual difference between the calculated and actual value is called a residual. The RMSE aggregates the residuals into a single measure.

The RMSE is derived by squaring the differences between the actual and calculated values, adding these residuals together, dividing that by the total number of values, and taking the square root of the result.

Optimising PDA battery life

Optimising PDA battery life
Optimising the battery life of your Mobile Device increases the efficiency of your Mobile GIS System. Here is a list of some of the modifications you can make to your Mobile Device to let you make the most of your time out in the field.

Power
Start/Settings/System/Backlight
Cycle through and set options for Battery Power, External Power, Brightness, Keypad Battery e.g. turn off backlight if not used for x minutes, set the screen brightness

Start/Settings/Power
Monitor and select power settings for your Mobile Device e.g. turn off device if not used for x minutes

Start/Settings/Power/Calibration
Check battery calibration status, and re-calibrate battery if recommended (only available on selected devices)

Memory
Start/Settings/Memory/Main
Monitor the free/available memory on your device.

Start/Settings/Memory/Running Programs
Monitor running programs and stop programs that may be churning up memory e.g. ActiveSync, Email, etc

Connections
Start/Settings/Connections/
Monitor the integration of your Mobile Device with other devices through Bluetooth, Wireless Manager and other Connection options, e.g. maintain Bluetooth connection when device is turned off, turn on/off Bluetooth and Wireless connections.

Thursday, December 4, 2008

Transferring photos from Ricoh cameras via BT

So that no one else has to stoop as low as I did and have to read the user manual, here is how you set up the Ricoh / iPaq to give the option to transfer photos via BT immediately after it has been taken.

Make sure BT is switched on on the iPaq

Configure the iPaq to receive the images

  1. Open the Bluetooth settings (Start -> settings -> Connections -> Bluetooth)
  2. Switch to the Services tab
  3. Select File Transfer
  4. Turn off “Authorization Required” and “Authetication (Passkey) required”
  5. Hit Advanced, and specify the folder to store the images to

Enable QuickSend on the Ricoh

  1. Press the [Menu OK] button
  2. On page 3 of the EXP SET page, change the quick send method to “1TOUCH”

Establish a BT connection between the Ricoh and the iPaq

  1. Press the [Menu OK] button
  2. Go to page 2 of the EXP SET page
  3. Select BT SERIAL, then click Right
  4. Click [ADJ] to search for devices in range
  5. Select your iPaq and press [MENU OK]
  6. Exit out of the menu – you should see the BT icon on the display

Send a photo to the iPaq

  1. Take a photo
  2. Hit the PLAY button
  3. Press [MENU OK] button, and switch to the 2nd page of the PLBK STGS menu
  4. Click RIGHT on the FILE SEND option
  5. Select your device
  6. Click SEND ONE

You will see a dialog on your iPAq confirming that you want to accept the image From now on you get the option to send the image when the quick review is displayed after an image is taken

  1. Click [OK MENU] during the quick review to send the image
  2. You will need to confirm the transfer from the iPaq also

Note that you can get the ricoh to establish the BT connection when it starts up by selecting [BT AUTO CONN] on the 2nd page of the EXP SET menu.

Monday, December 1, 2008

Bluetooth GPS Vs CompactFlash GPS - Which one suits me?

A common question for Mobile GIS users is whether to purchase a Compact Flash (CF) or Bluetooth (BT) GPS. Basically there is no wrong choice as both GPS receivers are functional devices in their own right and will provide a useful addition to your Mobile GIS system. The majority of BT and CF GPS receivers on the market these days come with chipsets that give them a standard positional accuracy of ±2-5 metres. Here are some points to think about when choosing between a BT and CF GPS receiver:

Compact Flash GPS
Pros
- Fits into the CF Slot of your PDA/UMPC/Laptop to make an ‘all-inclusive’ unit
Cons
- Limited to integrating with devices with a Compact Flash slot
- The battery of your Mobile Device is used to power the CF GPS, resulting in the battery life of your PDA/UMPC/Laptop dropping by up to half its standard lifespan

Bluetooth GPS
Pros
- Has its own battery independent of your PDA/UMPC/Laptop, so the battery life of your mobile device is not compromised
- Adaptable nature of Bluetooth allows integration with an increasing number of devices (e.g. PDA, Camera, Mobile Phone, etc )
Cons
- May be another piece of equipment to worry about in the field in addition to your mobile device (albeit a very small piece)

Thursday, November 27, 2008

Subtypes and Domains. What is what?

Subtypes, range domains and coded value domains. These are all terms that you may have heard tossed around in the ESRI world. But what exactly are they, and when should you use them? Here is a brief overview of the different terms.

Domains
Domains are rules that are applied to individual attributes that define the possible values for that property. There are two types of Domains in a Geodatabase: Range domains and Coded Value Domains.

Range Domains, as the name suggests, enforce a valid range of numerical values for an attribute. For example, an Age attribute for a Person feature class could be restricted from 0 to 100, meaning that all values between 0 and 100 are valid.

Coded Value Domains enforce a fixed list of values on a field, on any text, numeric or date field. These can be thought of as a look up table, as you can have a different code (the value that is actually stored in the field) to the description (the value that is displayed to the user when entering data). For example, a cadastral parcels feature class may have a zone property defining whether the property is residential (zone 1), commercial (zone 2) or industrial (zone 3). Coded value domains allow you to store the zone number, but display the more meaningful description to the users.

Subtypes
Subtypes are a sub-category of features in a feature class, that all share common properties (attributes). For example, you maye have a feature class of Animals, which you wish to categorise into species. In this case, the species would be the subtype.

The advantage of using subtypes is that you can specify different domains based on the subtype. Using the animals example again, you may have a height attribute with an associated range domain. You would most probably want a different range domain for elephants than for mice. Subtypes allow you to do this.

Subtypes and Domains in ArcPad
The good news is that since the release of ArcPad 7.1 and the new AXF file format, ArcPad directly supports subtypes and domains. This way all of your Geodatabase rules can be enforced at the time of collection in the field, making the data migration process from the field back to the office all the more easier.