Showing posts with label GPS. Show all posts

Tuesday, August 14, 2012

GeoDrive - GIS video integration

Over the past few weeks I have been working on an exciting new application in the world of mobile GIS that I wanted to share with you. In a nutshell, we are taking HD geotagged video footage, and integrating it with common mapping applications such as ArcPad, ArcMap and ArcGIS Explorer.

The application, GeoDrive, allows you to view the video footage, whilst outputting the spatial location of the current frame to the mapping applications. This means that you can view both the footage, and its location, at the same time. The applications are fully integrated; you can change the video and its position, and the location is updated in the map. Similarly, you can select a location on the map, and the video and position are located in the player. It is also possible to trigger events in the mapping application directly from the player. So, for example, you can click a button from the player, and a feature can be automatically captured in the mapping application at the current location.

Think of the performance and safety benefits of this. Imagine you are a council inspector and your job is to drive the roads of your shire, inspecting all of the council's assets, checking for any defects and works that need completing. Typically what you would do is hop in your car, drive along until you see something untoward, park your car, jump out with your PDA/GPS and log the details. You then need to go back to the car, and take off again on the hunt for the next defect.

Now, imagine what you can do with GeoDrive. All you need to do is mount a video camera on a vehicle, and send someone out to drive the entire road network. You can then come back to the safety and comfort of the office, and view the footage that was captured. As it is all spatially located, and fully integrated with your GIS application, you can log any defects directly from the footage. Simple!

GeoDrive has a range of applications, ranging from routine management surveys of linear assets (pipelines, roads, railways etc.) through to proof of work completion, quality control and asset collection.

A demonstration of GeoDrive in action can be viewed below:


GeoDrive can be used with any video camera, provided there is a way of linking the footage with spatial locations. There are a couple of ways of doing this: (1) using a video camera with an inbuilt GPS receiver; (2) using a standard video camera, and linking it to a data logging GPS receiver using GeoDrive post processing tools. We are also currently researching the viability of using accelerometers to position footage in places where GPS won't work, such as indoors and in pipelines.

The footage shown above utilised the first of these options, using the Contour GPS video camera (RRP $399 AUD). The camera was mounted on the inside of a car windscreen in bright, sunny conditions (hence the screen glare visible in parts of the footage). Being a rugged camera designed specifically for outdoor, action adventuring, these cameras can easily be mounted on the outside of vehicles to eliminate the glare and provide clearer footage. 

In fact, the cameras can be mounted just about anywhere, and taken just about anywhere. There is some pretty amazing sample footage available on the web - check out the Contour website for some samples. If you want a laugh, do a search for "fail". Some pretty funny stuff comes up. And remember, it is all research!

If you would like more details, or even a live online demonstration, please contact us at ContactUs@riamobilegis.com.au.

Friday, July 9, 2010

GPS Enabled Cameras

In the last 12 months there have been a flurry of GPS enabled cameras released on the market. The Samsung ST1000 led the way, offering 12.2 megapixels of photo quality with 5x optical zoom, inbuilt GPS, Bluetooth and WiFi.

Geotagged photos from the ST1000 are easily viewed with programs such as Picasa, Pictomia, Facebook, etc. RIA Mobile GIS include a complimentary copy of the RIA Location Extractor tool with camera purchases; this tool extracts photo locations out of the EXIF image header information into a CSV file, which can be added to a desktop GIS as an event theme.

Users looking for a rugged solution have the option of the proven RICOH 500SEW cameras. Additionally there are a number of PDA options with integrated cameras, including the GETAC PS236 (3MP), Trimble Nomad 800GLC (2MP) and Pidion BM170 (3MP).

Contact RIA for more information on any of these units.

Monday, June 22, 2009

Setting TDS/Trimble Nomad GPS for SOG & COG

By default some TDS/Trimble Nomad GPS's are not configured for Speed Over Ground (SOG) and Course Over Ground (COG).
The internal TDS/Timble Nomad GPS's can however be configured to transmit this information.

SirfTech is a small Windows Mobile application that can be used to access and configure the SiRF GPS's to transmit this information.

The steps to configure the TDS/Trimble Nomad SiRF GPS's to transmit SOG & COG as part of the NMEA string are:


  1. Download the SirfTech application, install SirfTech on the TDS/Trimble Nomad, and run the application.
  2. From the main SirfTech menu bar, select the 'SiRF' menu and select 'Switch to NMEA Protocol'.

  3. Ensure that the following are set - Baudrate: 9600, GLL: 1, VTG: 1 & RMC: 1. Click 'Set' and then 'OK'.

  4. Now select 'Com' from the SirfTech menu bar.
  5. Check that the number under the 'Messages NMEA' is increasing. Click 'OK'.

  6. Exit the application to finish.
Please take extreme care when using the SirfTech application. The application can be used to configure practically all the SiRF GPS settings.
RIA Mobile GIS cannot accept responsibility should users use the application to alter other GPS settings.

RIA Mobile GIS have only reviewed the application for the purpose of setting and configuring the Nomad devices for SOG & COG.
SirfTech is not a free application, if you find it useful please make a donation to the developer.

It should be noted that several months ago MapTel published a blog article detailing how to use the SatViewer application to configure the GPS to transmit this information. Since this article was published, RIA Mobile GIS have however discovered that on some Nomad devices the SatViewer application changes the GPS Protocol to the SiRF Protocol, even though the SatViewer indicates that the Protocol is still set to NMEA.
The SirfTech application appears to set the settings correctly.

Tuesday, April 28, 2009

GPS and Geotagging Images

Hardware such as the RICOH Caplio cameras with an integrated GPS Module are still a popular option for capturing images with location-specific information. However, emerging trends in the marketplace have called for cheaper options for users to capture images with a spatial location, in particular for the travelling masses.

On a recent trip to the Southwest National Park in Tasmania, I tested the GlobalSat BT-335 GPS and used it in a datalogging capacity. By simply synchronising the time on your camera with the time set on the GPS unit, it is possible to automatically geotag your images with location information when you arrive back in the office. After downloading the GPS Tracklog data from the GPS and the captured photos to the PC, the free Geotagging facility LOCR was used to automatically geotag my photos taken on the walk with the GPS coordinates logged with the GlobalSat BT-335 GPS.

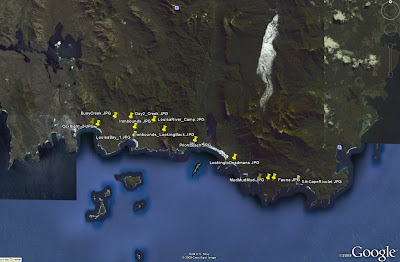
At a click of a button you can also view your photo points in Google Earth.

The BT-335 proved to be a reliable option for capturing GPS information to be linked with captured images. With 25 hours of battery life and a capacity to be used as either a stock standard Bluetooth GPS or a datalogger, the BT-335 is a great GPS option for fieldwork and travel alike.

Tuesday, December 23, 2008

How can I "stake out" points in ArcPad?

On many handhled GPS devices, you have the ability to "stake out" a point of interest. For example, you may know that you want to navigate to the nearest ice-cream store that has MGA94 coordinates of 527,105 5,251,855. How do you do this in ArcPad I hear you ask?

  1. Use the Find tool, and switch to the Location Tab.
  2. Make sure you change the coordinate system to what your coordinates are in (in this case MGA 94)
  3. Enter the coordinates of the location, specify the label on the map
  4. Click OK. The mark will be added to your map.
  5. Activate your GPS, open the GPS position window, and you will be given a bearing and a distance to travel in to reach your destination.

GPS Tracklog - Tips and Tricks

In recent times we have had a lot of queries about the GPS Tracklog in ArcPad - how it works, when it gets created, etc. etc. Here is a brief summary of things you should know.

How is it stored?
The GPS tracklog is stored as a point shapefile. Each point contains information such as the time, coordinates and quality estimates. ArcPad represents this shapefile as a line layer, which is what you see in the map when it is turned on.

Where is it stored?
By default, the GPS Tracklog is stored in My Documents. You can alter this from the GPS Tracklog Layer Properties, which can be accessed via the table of contents in the same way as any other layer.

When is the tracklog created?
The GPS tracklog is created when it is needed. If the shapefile is not present and the tracklog is turned on, it will automatically be created.

How do I start tracking?
Select Tracklog from the GPS drop down menu when your GPS is activated.

How do I clear the tracklog?
Stopped for a coffe and need to hide it from the boss? You can clear the Tracklog by clicking the Clear button from the Layer Properties of the Tracklog layer.

Can the tracklog log without showing in my map?
Yes. Open the Table of Contents, and you can toggle the visibility of the tracklog. Behind the scenes, ArcPad will keep logging positions.

What can I do with the tracklog at the end of the day?
As the tracklog is a shapefile, you can copy it off the device and store it back in the office. You could even create a Geodatabase, and store each day's log in there.

Thursday, November 13, 2008

.GPX - GPS eXchange Format

The GPS eXchange Format is an XML based file format used to describe GPS data. GPX data can be seamlessly transferred between GPS’s and applications that support the format.

Further information about the GPX format can be found at:

The GPX format is supported by a range of applications, including:

GPS eXchange Format and ArcGIS

A range of third party applications, including those listed above, can be used to convert .GPX files either directly to shapefiles (or GeoDatabase feature classes in the case of FME), or to a text format which can then be converted and loaded.

In ArcGIS ArcMap:

Within ArcGIS the .GPX format is supported using the Safe FME ArcGIS Data Interoperability Extension. Information about the formats supported is available from both Safe Software and ESRI.

The ArcPhoto Extension, which can be downloaded from the ESRI ArcScripts site, includes support for the upload of GPX Data, from a GeoProcessing Model. Further information can be accessed from ESRI ArcScripts, and search for either 'GPX' or 'ArcPhoto'.

In ArcGIS Explorer:

ArcGIS Explorer has native support for the import of .GPX data from the Tools > Import Menu.

Furthermore, a custom task, the GPS Data Manager, can be accessed and downloaded from the ESRI ArcScripts site enables the upload of GPX Data. Further information can be accessed from ESRI ArcScripts, and search for 'GPX'.

In ArcPad:

Within ArcPad .GPX data converted to Shapefile format, or data that has been checked out into AXF format, can both be utilised.

Usually ArcPad is configured to communicate directly with a GPS receiver. The data is streamed using a specific GPS Protocol and the spatial features are captured using the GPS location from within ArcPad. Features are stored in either a Shapefile or AXF feature class, and can be synced (checked in) and converted from within ArcGIS.