Showing posts with label ArcPad. Show all posts

Wednesday, August 15, 2012

Using ArcPad Training

We are proposing to run a number of Using ArcPad courses around Australia in the coming months.

The current courses proposed are:
  • Adelaide - In late September
  • Albury/Wodonga - In early October
  • Brisbane - In late October

Further information on the course can be viewed at the RIA Mobile GIS website here.

RIA Mobile GIS run scheduled and onsite training courses for ESRI software throughout Australia. Please feel free to contact us if you would like to schedule a training course for your organisation, or in your area.

Tuesday, August 14, 2012

GeoDrive - GIS video integration

Over the past few weeks I have been working on an exciting new application in the world of mobile GIS that I wanted to share with you. In a nutshell, we are taking HD geotagged video footage, and integrating it with common mapping applications such as ArcPad, ArcMap and ArcGIS Explorer.

The application, GeoDrive, allows you to view the video footage, whilst outputting the spatial location of the current frame to the mapping applications. This means that you can view both the footage, and its location, at the same time. The applications are fully integrated; you can change the video and its position, and the location is updated in the map. Similarly, you can select a location on the map, and the video and position are located in the player. It is also possible to trigger events in the mapping application directly from the player. So, for example, you can click a button from the player, and a feature can be automatically captured in the mapping application at the current location.

Think of the performance and safety benefits of this. Imagine you are a council inspector and your job is to drive the roads of your shire, inspecting all of the council's assets, checking for any defects and works that need completing. Typically what you would do is hop in your car, drive along until you see something untoward, park your car, jump out with your PDA/GPS and log the details. You then need to go back to the car, and take off again on the hunt for the next defect.

Now, imagine what you can do with GeoDrive. All you need to do is mount a video camera on a vehicle, and send someone out to drive the entire road network. You can then come back to the safety and comfort of the office, and view the footage that was captured. As it is all spatially located, and fully integrated with your GIS application, you can log any defects directly from the footage. Simple!

GeoDrive has a range of applications, ranging from routine management surveys of linear assets (pipelines, roads, railways etc.) through to proof of work completion, quality control and asset collection.

A demonstration of GeoDrive in action can be viewed below:


GeoDrive can be used with any video camera, provided there is a way of linking the footage with spatial locations. There are a couple of ways of doing this: (1) using a video camera with an inbuilt GPS receiver; (2) using a standard video camera, and linking it to a data logging GPS receiver using GeoDrive post processing tools. We are also currently researching the viability of using accelerometers to position footage in places where GPS won't work, such as indoors and in pipelines.

The footage shown above utilised the first of these options, using the Contour GPS video camera (RRP $399 AUD). The camera was mounted on the inside of a car windscreen in bright, sunny conditions (hence the screen glare visible in parts of the footage). Being a rugged camera designed specifically for outdoor, action adventuring, these cameras can easily be mounted on the outside of vehicles to eliminate the glare and provide clearer footage. 

In fact, the cameras can be mounted just about anywhere, and taken just about anywhere. There is some pretty amazing sample footage available on the web - check out the Contour website for some samples. If you want a laugh, do a search for "fail". Some pretty funny stuff comes up. And remember, it is all research!

If you would like more details, or even a live online demonstration, please contact us at ContactUs@riamobilegis.com.au.

Wednesday, January 5, 2011

ArcPad 10 Performance Tips

You might have seen a post that I did back in July (ArcPad Drawing Speed), which compared the drawing times of different datasets using ArcPad versions 7.1, 8.0 and 10.0. This research backed up the claims made by ESRI that version 10 has significantly improved performance over previous releases.

There are a few reasons for this. One of which is a new spatial index that is built in AXF files generated using the ArcPad Data Manager Tools for ArcGIS 10. Unfortunately, if you are still using ArcGIS 9.3, the Data Manager Tools have not been updated, and therefore, you will not receive the new indexing.

There is however a way around this:

  1. Generate your AXF file using either the ArcPad Data Manager tools for ArcMap, or ArcToolbox tools
  2. Open up the AXF file in ArcPad 10
  3. Open the Table of Contents, and open the layer properties of the layer you want to index
  4. Switch across to the Attributes page
  5. You will notice that the check box next to the Geometry field will be unchecked. Click it to build the index.
  6. Click OK on the Layer Properties, and OK on the Table of Contents dialog

The indexing will be applied to that layer, in that AXF from that point on (i.e. you do not need to repeat that process each time you start up ArcPad, unless you generate a new AXF file).

Some points to note are:
  • The above is only applicable to line and polygon layers
  • The indexing can only be read by ArcPad 10. It will not be used in 7.1 or 8.0

Thursday, December 23, 2010

Height Enabling ArcPad

Height enabling features (i.e. collecting 3D x,y,z positions) in ArcPad is simple. You just need to make sure that you have (1) your data set up correctly; and (2) correctly configure your hardware.

Configuring your data
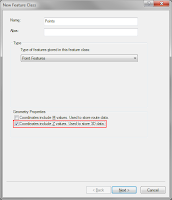
When creating a shapefile or feature class, you must specify that you want to z enable it. From within ArcGIS, this is simply a matter of selecting the "Coordinates include Z values. Used to store 3D data" option on the first page of the "Create new feature class" dialog.
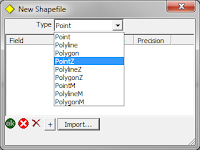
In ArcPad, when creating a new shapefile, you should select the feature type as "PointZ".

Unfortunately, there is no way of z enabling a pre-existing, non z enabled feature class. You must create a new one, import the fields from your previous feature class, then import all of the features across. In this case, any features already captured will not have valid z values. You will need to update these.

Any features from these datasets that are collected within ArcPad will automatically be assigned a z height value at the time of creation. If you digitise a point, a z height of 0 will be assigned. You can easily change this value manually via the geometry page of the edit form if required. If you capture the features using a GPS or laser rangefinder, then provided they are configured correctly to output height coordinates, then these will automatically be assigned to the feature.

Configuring your hardware
This part will probably either be very easy, or a little bit tricky. Basically what you want to do is to make sure that whatever hardware you are using (GPS, laser rangefinder) is outputing data that includes height information. Most GPS units will do this by default. So unless you have gone in to your GPS and altered the messages that are being sent from it, you should be pretty right. If you have played around with the GPS, you will need to dig out your manual and make sure that the height information is being exported correctly.

With laser rangefinders, it should be as simple as making sure that some form of height measurement is being read and exported to ArcPad. For example, you should read the slope distance and inclination to the target. If you export only the bearing and the horizontal distance, then ArcPad has no way of knowing what the change in height from your position to the target actually is.

Accessing the height information
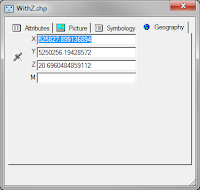
Accessing the height of your points from within ArcPad is also simple. When you create or edit a point, you can switch to the Geography page, which will show the coordinates of the point (including the z height). If you have a line or a polygon layer, it will list all of the coordinates of all of the vertices of that feature.
You can do the same when identifying a feature.

From within ArcGIS, it is not quite so simple. You must add the feature class to ArcMap, start an edit session, use the Edit Tool from the Editor toolbar (the black arrow), double click the point, then open the "Edit Sketch Properties" window. This will list the X, Y, Z coordinates of the selected point (or vertices of a line or polygon).

Another way of viewing this information is to add a float (or double) field to the feature class, then use the "Calculate Geometry" tool in the table view in ArcMap, to calculate the z coordinates of each feature and store that to a field.

Monday, August 16, 2010

ArcPad Check Out Problems

When you check data out for use in ArcPad, the AXF file that gets generated is stamped with the source Geodatabase. This means that when you go to check that data back in, the ArcPad Data Manager for ArcMap and the ArcPad Geoprocessing tools know where the data needs to be uploaded to.

This works really well, because you do not need to place the AXF back in to the same folder that it was checked out to (as you did with previous versions of ArcPad that used shapefiles). The drawback to this is however, when the source workspace is moved: ArcPad has no way of knowing where to put the field edited data.

The simplest way of finding where the Geodatabase should be, is to load the AXF into the ArcPad Data Manager in ArcMap. The source workspace is listed on the form:

If this workspace has a really long path however, you will not be able to see the full path. The other way to find the source workspace is to view the AXF Transaction Log that is stored within the AXF (in the AXF_Properties table). To do this:
  1. Open the AXF in Studio
  2. Start a command window
  3. Copy the SQL statement below, paste it into the window and execute it.
SELECT CONVERT(nvarchar, XML)
FROM AXF_PROPERTIES
WHERE NAME='AXF_TRANSACTION_LOG'

You will see a whole lot of text, which at first may just look like it is in Swahili or some other foreign language, but if you look closely, it is actually XML. The first tag that you will see is CHECKOUT. The third attribute of this tag is 'workspace': the value of this attribute is the source Geodatabase that the AXF was originally generated from.


This is the location that you will need to move the Geodatabase to (temporarily) to allow you to check the data back in.

Monday, July 12, 2010

New ESRI Service Packs Released

For those of you who are not ready to make the switch to ArcGIS and ArcPad 10, Service Packs for both ArcGIS 9.3.1 (SP2) and ArcPad 8.0 (SP4) are now available for download from the following links:
News sparked wild celebrations in the streets of Spain early this morning.


Thursday, July 8, 2010

ArcPad Drawing Speed

One of the major enhancements in ArcPad 10 is "Improved Performance", in particular, drawing speeds. I thought I would do some quick comparisons between versions 7.1, 8.0 and 10.0 to see just how significant these improvements were.

Process
I set up a simple applet which zooms around the map in ArcPad to various pre-defined extents, logging the drawing times of each layer in the map. My map had 5 (AXF) layers in total:


The pre-defined extents were selected at random locations, each at different scales. After zooming in to a small area, I forced ArcPad to zoom back out to the full extent to make sure that it was forced to re-draw as many features as possible. The tests were repeated 5 times for each version of ArcPad.

The tests were performed on a virtual machine, running Windows XP (3GHz processor, 768Mb RAM).

Results:
The results from the tests are shown below. ArcPad 7.1.1 times are shown in blue, 8.0.3 in red, and 10 in green. Times are shown in milliseconds, and represent the total time taken to draw all 5 layers (averaged over the five tests).


So, the good news is there is a definite decrease in drawing times in version 10, particularly when zoomed out to full extent. Interestingly the drawing times for Area 1 were quite high, and in most cases, higher than the full extent. Upon inspection, it turns out the around 90% of the features lied within Area 1. The table below shows the feature counts in each layer, at the different zoom extents:


If you would like a larger graph or more detailed figures, or just want to find out more about the testing that I did, leave us a comment.

Wednesday, July 7, 2010

Mobile GIS Trend 1 - Other OS's

Although historically evolving from a number of operating platforms, with the inception of ArcGIS, ESRI has predominantly focused on supporting the Microsoft Windows environment for their Desktop and Mobile products.

With regards to the Mobile GIS arena Windows is the dominate OS for Laptops, UMPC's and Netbook's, and Windows Mobile/CE is the dominant OS for PDA's and Rugged Handheld devices.

ESRI has this side of the market covered with it's existing ArcPad and ArcGIS Mobile offerings.

The mobile area in which Windows is lacking behind the competition is the Smartphone market. In this sector Windows has actually lost market share, whilst in comparison both Apple iOS (iPhone & iPad) and Android OS have substantially increased their market share.

ESRI is now aiming at solutions to cover both these platforms with mobile product offerings:

ArcGIS for iOS


  • The ArcGIS for iOS Application is a free application that can be downloaded from iTunes. It allows you to share maps from ArcGIS Online, and use tools to search, measure, identify and query data. (At a later stage it will also include a range of other functions).
  • The ArcGIS API for iOS enables iOS developers to build custom applications that leverage of the capabilities of ArcGIS Server.

ArcGIS for Android

Over the coming months it is going to be interesting to watch the uptake of the new Windows Phone 7 OS to see if this again alters the Smartphone market. There are some interesting times ahead.

Wednesday, March 3, 2010

ArcPad and Application Builder Training


Time to put your learning hats on! RIA have just scheduled two more training courses for Melbourne in May:
Note: Course dates have been rescheduled from the original dates.

For further details on the courses, as well as the other courses that we offer, please visit the Support and Training page of our website.

To register your interest, download the appropriate form below, and return to us ASAP.
Be Quick: Numbers are limited and early bird discounts apply!

Thursday, February 18, 2010

Hyperlinking Photos in ArcPad and ArcGIS

Here are some quick and simple steps to allow you to view photos linked to features.

For this example, we will assume that we have a point feature class called "Trees", with a field called "Photo" which contains the file name of the photo linked to that feature. All of our photos are stored in c:\Photos.

ArcPad
  1. Open ArcPad, and add the trees layer to your map
  2. Open the Table of Contents
  3. Open the Layer Properties for that layer
  4. Go to the Hyperlink page
  5. Set the Hyperlink field to Photo
  6. Set the default hyperlink path to the folder that contains the photos
  7. Click OK twice to close the dialogs
  8. Use the Hyperlink tool from the Browse toolbar to select the tree on the map. If a photo is found, it will be opened for viewing.


ArcGIS: HTML Popups
  1. Open ArcMap, and add your Trees feature class
  2. Open the layer properties
  3. Switch to the HTML Popup page
  4. Check the "Show content for this layer using the HTML Popup tool" option
  5. Select "As a URL"
  6. In the prefix box, enter "C:\Photos" - the folder containing the photos.
  7. Select Photo as the hyperlink field
  8. Leave the suffix blank (supposing the file names already have the .jpg extension)
  9. Click OK.
  10. Use the HTML Popup tool
    to select features from the map. A small window will "pop up" from the point showing the photo for that feature.

ArcGIS: Hyperlinking
  1. Open ArcMap, and add your Trees feature class
  2. Open the layer properties
  3. Switch to the Display page
  4. Check "Support Hyperlink using field:"
  5. Specify the hyperlink field to "Photo"
  6. Click OK
  7. Use the hyperlink tool to select features from the map.

Note: With hypperlinking, you will need either an absolute or relative path in the Photo field for this tool to work. An easy way to add these prefixes to the attribute is using these ArcMap field calculations.


Friday, February 12, 2010

ArcPad 8 - Service Pack 3 Released

ArcPad 8.0 Service Pack 3 is now available for download from the ESRI Support Website.

The service Pack addresses a number of issues, including Windows Vista/Windows 7 compatibility, foreign language support for ArcPad Studio and various performance enhancements. A full list of the issues addressed can be found in the ArcPad 8.0 SP3 Readme file.

Out of interest, we tested Service Packs 2 and 3 on a Trimble Nomad with an AXF file with a single feature class that had:
  • 55 attributes
  • 3 different subtypes
  • 25 coded value domains
The time taken from when you digitised a point on the map to when the form displayed was 7 seconds with SP2, but only 2.5 seconds with SP3. General map navigation was also noticeably better.

Friday, February 5, 2010

Using ArcPad Training - Gold Coast Update


The venue for the upcoming 'Using ArcPad' course, to be held on 3 March 2010 has been finalised.

The course will be run at the Freshwater Point Resort, Broadbeach, Gold Coast, QLD (not far from the OZRI venue).

More information on the course can be found on the Support and Training page of our site. To register your interest, Download the Registration Form, and send it back to us.

Wednesday, October 28, 2009

ArcPad 8 Service Pack 2 Released

Service Pack 2 for ArcPad 8.0 was released over the weekend. It is available from the ESRI website. Fixes include:
  • the reduction of drawing flickering
  • improvements to symbology and labelling
  • a new developer sample
A full list of the issues addressed in this released can be found here.

Tuesday, August 11, 2009

Using ArcPad Training Course - Brisbane

Following on from the popularity of our Using ArcPad training courses in Adelaide, Darwin and Hobart, we have now scheduled one in Brisbane on the 8th of October. If you are interested in attending, please download the registration form from our website, and return it to us as soon as possible. Be quick - early bird discounts apply!

Course updates:
  • Adelaide - 19th August 2009
  • Course is fully booked. If you are interested in attending at a later date, please contact us and register your interest
  • Darwin - 1st September 2009
  • Early bird registrations close on the 12th August 2009 (register)
  • Hobart - 22nd September 2009
  • Early bird registrations close on the 19th August 2009 (register)
  • Brisbane - 8th October 2009
  • Early bird registrations close on the 11th September 2009 (register)

We have also had a considerable amount of interest in our ArcPad Application Builder training course. Stay tuned if you are interested, as we will look at scheduling one of these in the not too distant future. If you would like one in your area, then please let us know.

Tuesday, July 21, 2009

Field Naming Tips #2

Another tip when naming fields in a feature class, for use with ArcPad: Avoid using SQLCE reserved words.
You will find that if you do use any of these words, you will not be able to check any features in. When you select the AXF from the ArcPad Data Manager Toolbar, it will correctly list the number of features that you have created in the field (in the summary section), but then when you try to check it in, it says there are no edits in the selected layer. Unfortunately there are no error messages displayed telling you why the check in failed. I have lodged another request with ESRI, so we will see how we go in the future.
The complete list of SQLCE reserved words can be found here.

Subtype Field Names: Make them different to the feature class name

I recently had a call from a client using ArcPad 7.1, saying that their drop down lists (subtypes and coded value domains) were not appearing in ArcPad. I got a copy of their database, and performed my own check out to see what was happening.
First of all, I checked the feature class in ArcCatalog and ArcMap. All of the lists appeared as expected there.
Next I checked the .axf.xml check out log, which gets created in the same directory as the AXF file. Usually this reveals a lot about why check out was not successful, for things such as data and schema errors. Again, this was empty.
I then opened up the AXF file in ArcPad Studio, and it turned out that the Data Tables branch of the AXF structure was empty. This is where all of these tables are stored within the AXF.
After digging around for a while, I realised that the feature class was called Heritage, which was the same as the Subtype field. Turns out that this was the cause of the problem; if I renamed that field, it all worked as expected.
There are two reason for writing this blog:
  1. To make you aware of the bug - I have logged this with ESRI so hopefully it will get fixed soon.
  2. To outline the troubleshooting process that I went through.
Hopefully someone will find this of use. If nothing else, it should serve as a reminder for me!

Friday, July 17, 2009

GUIDs and Global ID Fields for Related Tables in ArcPad

When working with related tables, you will often need some form of unique value to make up the Primary Key / Foreign Key relationship. This is particularly important in ArcPad, where more than likely, you will have multiple field officers collecting data at the same time.

Perhaps the most convenient way of achieving this is through the use of Global IDs and GUIDs. Both of these data types store registry style strings consisting of 36 characters enclosed in curly brackets: for example, {90A942E1-BC7C-4F1E-94D5-AACAAD24F08C}. What this means is that there are a total of 2128 possible values – which makes the likelihood of repeating a value within your database about as likely as South Africa winning the next World Cup.

What is the difference between the two? ArcGIS actively maintains the Global ID fields (i.e. when a new feature is created, a GUID value will be assigned), whereas the GUID fields are left blank. It is up to the user to maintain these fields.

So to use these in your relationship class, you need to use the Global ID in the Origin Table as the Primary Key, and have a GUID field in the Destination Table as the Foreign Key. This way, ArcGIS and ArcPad will automatically copy the Primary Key Global ID into the Foreign Key GUID field.

To explain this a bit better, let's work through an example. Let's assume that we have a relationship between a feature class 'Weeds' and a related table 'Inspections'. Here, you would:

  • Set up the feature class with the required fields
  • Set up the related table with the required fields
  • Add the Global ID field to the Weeds feature class
    • Right click on the Weeds feature class in ArcCatalog
    • Select 'Add Global IDs...'
  • Add a GUID field to the Inspections table
    • Right click on the Inspections table in ArcCatalog
    • Select Properties
    • In the Fields page, add a field called 'Weed_ID' and make it type GUID
  • Create a relationship class between the feature class and the table
    • Right click in ArcCatalog
    • Select New à Relationship Class...
    • Follow the prompts. Make the:
      • Origin Table = Weeds feature class
      • Destination Table = Inspections Table
      • Primary Key = GlobalID (Weeds feature class)
      • Foreign Key = Weed_ID (Inspection table)

Some considerations if using this approach:

  • You must use ArcPad 8 Service Pack 1 – previous versions do not support GUIDs or GlobalIDs
  • In order to check the layer out to AXF, your feature class must be a versioned SDE feature class
  • As you are working with Relationship classes and ArcSDE, you will need ArcEditor or ArcInfo licenses to check the data back in (interestingly, you can still check out with just an ArcView license)

Remember that you can always set up the relationship using standard field types (numeric, text etc.), which you will need to do if you are not using an SDE database. Some simple coding can provide you with unique values to use in the relationship.

Monday, July 13, 2009

ArcPad 8 Service Pack 1 Released

Good news, ArcPad 8.0 Service Pack 1 and ArcGIS Server ArcPad Extension 8.0 Service Pack 1 have now been released. They can be downloaded from the following link:
http://support.esri.com/index.cfm?fa=downloads.patchesServicePacks.viewPatch&PID=26&MetaID=1537

Some improvements to note are:
· Improved detection of generic USB Serial Port GPS, Garmin USB GPS, and Bluetooth Serial Port GPS devices on the Windows platform
· Map.Select no longer fails with a script error when used with AXF layers
· Map.Layers(x) returns Nothing if the layer x is not present, as per previous versions of ArcPad
· Improved hardware button support
· Related Table form samples.
· .NET integration samples

More information on the release of Service Pack 1 is available at:
http://downloads2.esri.com/support/downloads/pad_/ArcPad8.0_SP1_ReadMe.pdf

Monday, March 30, 2009

ArcPad Tips & Tricks #2: Multiple layer definitions

Did you know that the AXF file format supports multiple layer definitions for a single feature class? This works in the same way as Layer files in ArcMap: the layer defines the symbology, which points to a feature class, which stores all of the data (both spatial and attributes). To set this up in ArcPad:
  1. Open the AXF in ArcPad studio
  2. Expand the Feature Tables node
  3. Right click on the table you wish to create the layer definition for, and select "Create New Layer". A new layer definition is added to the Feature Layers node
  4. You can rename the layer to whatever you like

And how is this useful I hear you ask. Well, a couple of ideas are:

  1. You could create different edit forms for different purposes. For example, you may have a layer for new features that are collected, and one for follow up inspections. You can specify different forms to ensure the correct fields are filled out in each inspection.
  2. You can combine the layer definitions with filters to create more complex symbology. For example, you may wish to categorise your roads layer into suburban roads, major roads and highways, and display them at different zoom scales.

Wednesday, March 25, 2009

ArcPad Tips & Tricks #1: Layer Icons


Did you know that you can set icons for your layers. These will appear in the Table of Contents and the Edit drop down menu, making it easier to differentiate between your layers.


For shapefiles, all you need to do is copy a .ico file, with the same base name as the shapefile, into the same directory. So, for example, if your shapefile is Roads.shp, name you .ico file Roads.ico.

The process is a bit more complicated with AXF files. You need to open up the axf in Application Builder, right click the layer and select "Set Layer Icon". You can clear the icon by selecting "Clear Layer Icon".

A good selection of sample icons can be found in C:\Program Files\ArcPad 7.1\Samples\Layer Icons. If you want to make your own, a good program is IcoFX. Your icons need to be 4bit 16x16 images.