Friday, January 28, 2011
ArcGIS 10 GDBT

Wednesday, January 5, 2011
ArcPad 10 Performance Tips
 You might have seen a post that I did back in July (ArcPad Drawing Speed), which compared the drawing times of different datasets using ArcPad versions 7.1, 8.0 and 10.0. This research backed up the claims made by ESRI that version 10 has significantly improved performance over previous releases.
There are a few reasons for this. One of which is a new spatial index that is built in AXF files generated using the ArcPad Data Manager Tools for ArcGIS 10. Unfortunately, if you are still using ArcGIS 9.3, the Data Manager Tools have not been updated, and therefore, you will not receive the new indexing.
There is however a way around this:
- Generate your AXF file using either the ArcPad Data Manager tools for ArcMap, or ArcToolbox tools
- Open up the AXF file in ArcPad 10
- Open the Table of Contents, and open the layer properties of the layer you want to index
- Switch across to the Attributes page
- You will notice that the check box next to the Geometry field will be unchecked. Click it to build the index.
- Click OK on the Layer Properties, and OK on the Table of Contents dialog
- The above is only applicable to line and polygon layers
- The indexing can only be read by ArcPad 10. It will not be used in 7.1 or 8.0
Thursday, December 23, 2010
Height Enabling ArcPad
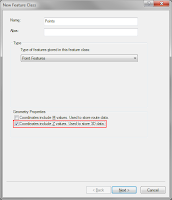
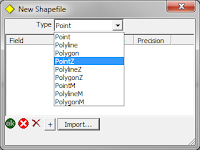
 When creating a shapefile or feature class, you must specify that you want to z enable it. From within ArcGIS, this is simply a matter of selecting the "Coordinates include Z values. Used to store 3D data" option on the first page of the "Create new feature class" dialog.
 Accessing the height of your points from within ArcPad is also simple. When you create or edit a point, you can switch to the Geography page, which will show the coordinates of the point (including the z height). If you have a line or a polygon layer, it will list all of the coordinates of all of the vertices of that feature.
Monday, November 22, 2010
ArcGIS & ArcPad 10 SP 1
Wednesday, August 18, 2010
ArcPad Data Manager Toolbar: Select Picture Options (ArcGIS 10)
 The ArcPad Data Manager toolbar within ArcGIS 10 has an extra page available during the Get Data for ArcPad (Check Out) process. Within this page the user can identify the picture field(s) within the dataset(s), and also define the location where pictures will be stored during the Get Data from ArcPad (Check In) process.
When field data and photos have been collected in the field and then imported back into the ArcGIS/office environment using the Get Data from ArcPad (Check In) tool, the Picture field(s) are populated using the predefined folder location for Pictures and the name of the image (e.g. D:\MyPhotos\Pictures_0001.jpg).
 When identifying a point in ArcMap, the ArcGIS 10 dialog lists the point attributes, with the hyperlink function automatically enabled for Picture fields where an image exists. The user can simply click on the Picture field path and the image will be displayed on screen.
 Monday, August 16, 2010
ArcPad Check Out Problems

- Open the AXF in Studio
- Start a command window
- Copy the SQL statement below, paste it into the window and execute it.

Monday, August 9, 2010
Application Builder Training - Melbourne - 11 November
 RIA Mobile GIS will be holding an ArcPad Application Builder Training Course in Melbourne on Thursday the 11th November. The course will be held in the CBD (venue to be confirmed), using ArcPad Version 10.
 Wednesday, August 4, 2010
Getac E100A Tablet Release

ArcPad 10 Training - Perth

The popular Using ArcPad training course has been scheduled for Wednesday the 22nd of September in Perth.
Further information on the course can be viewed at the RIA Mobile GIS website here.
RIA Mobile GIS run scheduled and onsite training courses for ESRI software throughout Australia, please contact us if you would like to register your interest for any future training courses.
Monday, August 2, 2010
Handy AXF Export Tools in ArcPad 10
- Shapefile
- DBF
- Microsoft Excel
- Adobe PDF
Thursday, July 29, 2010
ESRI Mobile GIS Offerings
- ArcPad - ArcPad 10 is designed for Windows and Windows Mobile devices.
- ArcGIS Mobile - ArcGIS Mobile 10 is for Windows and Windows Mobile devices.
- ArcGIS for iOS - Apple iOS devices - iPod (Touch), iPhone and iPad.
- ArcGIS for Windows Phone (Under Development) - Windows Phone 7 Devices.
- ArcGIS for Android (Under Development, according to the UC 2010 Q&A) - Android OS devices - Smart Phones other Android devices.
Update to the Update
Wow, ESRI sure are making some moves in the Mobile GIS space. There is already an update to my Updated ESRI Mobile Applications, and hence an update to the update on the Mobile Trends Post.
ESRI have added some information to their Mobile GIS site covering the ArcGIS for Windows Phone offering.
ArcGIS for Windows Phone 7
The solution is coming! It will include an application for use on Windows Phone devices and an API that enables developers to create their own applications.
We will keep you posted with regards to the release of both the Windows Phone and Android solutions.
Monday, July 26, 2010
ArcGIS 10 Licencing
ESRI have changed the software Installation, Authorisation and Licencing process for ArcGIS 10.
The software product Downloads and Authorization is all controlled through the New ESRI Customer Care site. The Login to the Customer Care is with your ESRI Global Account.
Resources for Authorisation and Licencing ArcGIS 10 can be found at:
- The ESRI Australia site in the ArcGIS 10 FAQ area.
- The ArcGIS Desktop 10 Resource Center, under the Install and Authorize area.
- The ArcGIS Server 10 Resource Center, under the Install and Authorize area.
- ESRI have also released a White Paper detailing the ArcGIS 10 Licencing Concepts and Strategies (PDF).
Thursday, July 22, 2010
ArcPad 10 Splash Screen
 In ArcPad 10, the welcome (splash) screen has been revamped to simplify the process of loading up a map, and starting data collection in the field. With a single click, you can:
- create a new empty map
- create a QuickProject
- open an existing map
- open the previous map used
- Right click on the ArcPad shortcut, and select "Properties"
- Switch to the Shortcut tab
- Under the Target path, add /nosplash to the end (make sure you put a space after the final ")
- Click OK
Tuesday, July 20, 2010
MS Word Tip #2
 Those annoying hyperlinks in Microsoft Word have struck again! This time, we were trying to find a simple way to change all visited links back to unvisited; i.e. from purple back to blue. Should be easy, I know, but it isn't.
- Click the "Word Button" (Office 2007)
- On the Word Options dialog, go to "Advanced"
- Scroll to the very bottom, and select "Web Options"
- Switch to the "Files" tab
- Uncheck "Update links on save"

