Laser Rangefinders are devices designed to measure distances from your current position to a specified target, and can be easily integrated with your Mobile Field Unit/PDA via Bluetooth.
Here are the steps required to configure your Laser Rangefinder with a PDA running ArcPad:
1) Setup a relationship by pairing your PDA with the Laser Rangefinder using the Bluetooth Manager on your PDA. You may be required to enter a passcode for the Laser Rangefinder, for the TruPulse 360B unit the Passcode is 1111.
2) Within ArcPad, from the GPS Drop Down menu go to 'Rangefinder Preferences'.
- Set the Protocol as "Lasercraft Contour" for TruPulse 360B unit (see support.esri.com for required protocol for other Rangefinders).
- Specify the COM Port to be the same as set between the PDA and your Laser Rangefinder in step 1 above.
- Set the Baud Rate to be 4800.
3) From the GPS Drop Down menu, select 'Rangefinder Active'.
4) For the dataset that you are capturing data, make sure it is editable within ArcPad. Now select the 'Offset Point' tool (or 'Offset Polyline' tool if you are capturing polylines).
- Capture a point on your ArcPad map for your current location using the screen input, or the GPS if your PDA has an active GPS.
- The GPS Offset Window will now be presented to the user.
- Measure the distance to the required feature using the Laser Rangefinder. The GPS Offset Window will now be updated with the measurements observed using the Laser Rangefinder.
- Note that if you have a PDA with an integrated GPS that is active, the XY Location information will also be updated in the GPS Offset Window.
- Click Ok to accept measurements, and you will be now presented the Attribute Form for the captured data.
Tips:
i) Make sure that your required Rangefinder Extensions are switched on within ArcPad (Advanced Options/Extensions Tab).
ii) Turning off the PDA will drop the Bluetooth connection between the PDA and your Laser Rangefinder. You should configure the options on your PDA (Start\Settings\System\Power) so that the device will not turn off after a certain amount of user inactivity.
iii) In addition to your basic Point Offset tool, there are a number of other functions you can utilise for Laser Rangefinders within ArcPad, refer to the ArcPad User Guide for more information.
Tuesday, June 23, 2009
Monday, June 22, 2009
Setting TDS/Trimble Nomad GPS for SOG & COG
By default some TDS/Trimble Nomad GPS's are not configured for Speed Over Ground (SOG) and Course Over Ground (COG).
The internal TDS/Timble Nomad GPS's can however be configured to transmit this information.
SirfTech is a small Windows Mobile application that can be used to access and configure the SiRF GPS's to transmit this information.
The steps to configure the TDS/Trimble Nomad SiRF GPS's to transmit SOG & COG as part of the NMEA string are:
RIA Mobile GIS cannot accept responsibility should users use the application to alter other GPS settings.
RIA Mobile GIS have only reviewed the application for the purpose of setting and configuring the Nomad devices for SOG & COG.
SirfTech is not a free application, if you find it useful please make a donation to the developer.
It should be noted that several months ago MapTel published a blog article detailing how to use the SatViewer application to configure the GPS to transmit this information. Since this article was published, RIA Mobile GIS have however discovered that on some Nomad devices the SatViewer application changes the GPS Protocol to the SiRF Protocol, even though the SatViewer indicates that the Protocol is still set to NMEA.
The SirfTech application appears to set the settings correctly.
The internal TDS/Timble Nomad GPS's can however be configured to transmit this information.
SirfTech is a small Windows Mobile application that can be used to access and configure the SiRF GPS's to transmit this information.
The steps to configure the TDS/Trimble Nomad SiRF GPS's to transmit SOG & COG as part of the NMEA string are:
- Download the SirfTech application, install SirfTech on the TDS/Trimble Nomad, and run the application.
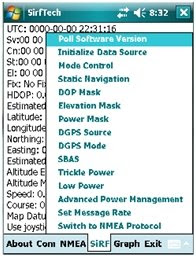
- From the main SirfTech menu bar, select the 'SiRF' menu and select 'Switch to NMEA Protocol'.
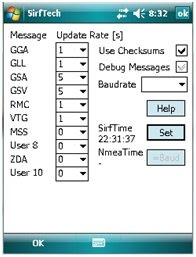
- Ensure that the following are set - Baudrate: 9600, GLL: 1, VTG: 1 & RMC: 1. Click 'Set' and then 'OK'.
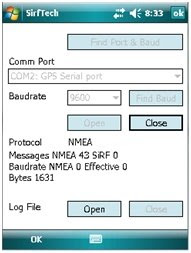
- Now select 'Com' from the SirfTech menu bar.
- Check that the number under the 'Messages NMEA' is increasing. Click 'OK'.
- Exit the application to finish.


RIA Mobile GIS cannot accept responsibility should users use the application to alter other GPS settings.
RIA Mobile GIS have only reviewed the application for the purpose of setting and configuring the Nomad devices for SOG & COG.
SirfTech is not a free application, if you find it useful please make a donation to the developer.
It should be noted that several months ago MapTel published a blog article detailing how to use the SatViewer application to configure the GPS to transmit this information. Since this article was published, RIA Mobile GIS have however discovered that on some Nomad devices the SatViewer application changes the GPS Protocol to the SiRF Protocol, even though the SatViewer indicates that the Protocol is still set to NMEA.
The SirfTech application appears to set the settings correctly.
Labels:
Course Over Ground,
GPS,
SiRF,
Speed Over Ground
Tuesday, June 2, 2009
ArcPad Tips & Tricks #6: Minimising ArcPad 8 on handheld devices
Users may have noticed the absense of the minimise function in ArcPad 8 on handheld devices(the red cross in upper right corner of screen).
To minimise ArcPad 8 on handheld devices (e.g. Nomad etc), hit the Windows button on the keypad twice in quick succession. This will effectively minimise ArcPad and return you to the home screen of the handheld unit. As in previous version of ArcPad, clicking on the ArcPad icon in the bottom right corner of the home screen will resume the ArcPad program where you left off.
Subscribe to:
Comments (Atom)