Showing posts with label ESRI. Show all posts

Monday, July 12, 2010

New ESRI Service Packs Released

For those of you who are not ready to make the switch to ArcGIS and ArcPad 10, Service Packs for both ArcGIS 9.3.1 (SP2) and ArcPad 8.0 (SP4) are now available for download from the following links:
News sparked wild celebrations in the streets of Spain early this morning.


Wednesday, March 3, 2010

ArcPad and Application Builder Training


Time to put your learning hats on! RIA have just scheduled two more training courses for Melbourne in May:
Note: Course dates have been rescheduled from the original dates.

For further details on the courses, as well as the other courses that we offer, please visit the Support and Training page of our website.

To register your interest, download the appropriate form below, and return to us ASAP.
Be Quick: Numbers are limited and early bird discounts apply!

Thursday, February 18, 2010

Hyperlinking Photos in ArcPad and ArcGIS

Here are some quick and simple steps to allow you to view photos linked to features.

For this example, we will assume that we have a point feature class called "Trees", with a field called "Photo" which contains the file name of the photo linked to that feature. All of our photos are stored in c:\Photos.

ArcPad
  1. Open ArcPad, and add the trees layer to your map
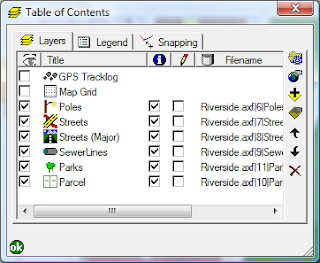
  2. Open the Table of Contents
  3. Open the Layer Properties for that layer
  4. Go to the Hyperlink page
  5. Set the Hyperlink field to Photo
  6. Set the default hyperlink path to the folder that contains the photos
  7. Click OK twice to close the dialogs
  8. Use the Hyperlink tool from the Browse toolbar to select the tree on the map. If a photo is found, it will be opened for viewing.


ArcGIS: HTML Popups
  1. Open ArcMap, and add your Trees feature class
  2. Open the layer properties
  3. Switch to the HTML Popup page
  4. Check the "Show content for this layer using the HTML Popup tool" option
  5. Select "As a URL"
  6. In the prefix box, enter "C:\Photos" - the folder containing the photos.
  7. Select Photo as the hyperlink field
  8. Leave the suffix blank (supposing the file names already have the .jpg extension)
  9. Click OK.
  10. Use the HTML Popup tool
    to select features from the map. A small window will "pop up" from the point showing the photo for that feature.

ArcGIS: Hyperlinking
  1. Open ArcMap, and add your Trees feature class
  2. Open the layer properties
  3. Switch to the Display page
  4. Check "Support Hyperlink using field:"
  5. Specify the hyperlink field to "Photo"
  6. Click OK
  7. Use the hyperlink tool to select features from the map.

Note: With hypperlinking, you will need either an absolute or relative path in the Photo field for this tool to work. An easy way to add these prefixes to the attribute is using these ArcMap field calculations.


Friday, February 12, 2010

ArcPad 8 - Service Pack 3 Released

ArcPad 8.0 Service Pack 3 is now available for download from the ESRI Support Website.

The service Pack addresses a number of issues, including Windows Vista/Windows 7 compatibility, foreign language support for ArcPad Studio and various performance enhancements. A full list of the issues addressed can be found in the ArcPad 8.0 SP3 Readme file.

Out of interest, we tested Service Packs 2 and 3 on a Trimble Nomad with an AXF file with a single feature class that had:
  • 55 attributes
  • 3 different subtypes
  • 25 coded value domains
The time taken from when you digitised a point on the map to when the form displayed was 7 seconds with SP2, but only 2.5 seconds with SP3. General map navigation was also noticeably better.

Wednesday, October 28, 2009

ArcPad 8 Service Pack 2 Released

Service Pack 2 for ArcPad 8.0 was released over the weekend. It is available from the ESRI website. Fixes include:
  • the reduction of drawing flickering
  • improvements to symbology and labelling
  • a new developer sample
A full list of the issues addressed in this released can be found here.

Tuesday, August 25, 2009

ArcMap Field Calculations

Often in a feature class, you will have an attribute which stores the file name and path of a file that is linked to that feature. For example, you may have a photo, a video or a condition report (PDF) which contains additional information about the feature. You can then use the Hyperlinking functionality in ArcMap to view the files via your map.

If you are storing the file paths as full paths (as opposed to relative), you may encounter some problems if you want to move the location of the images, reports etc. You could manually go through and update the paths, or you can use these simple field calculations.

Change File Paths
FileField = [FILE_PATH]
OrigPath = "D:\Temp"
NewPath = "C:\temp"
output = Replace(
FileField , OrigPath, NewPath )

Remove File Path
FileField = [FILE_PATH]
iLength = Len (
FileField )
iLastInd = InStrRev (
FileField , "\" )
iDif =
iLength - iLastInd
output = Right ( FileField , iDif )

To use them:
  1. Open the table of the feature class in ArcMap
  2. Start an edit session
  3. Right click on the column header, and select Field Calculator
  4. Click the advanced check box
  5. Copy the script into the "Pre-Logic VBA Script Code" box
  6. Replace the FileField property to the field that contains the file path in your feature class (delete the [FILE_PATH] part, and double click the appropriate field in the Fields List of the calculator)
  7. If changing the file path, update the OrigPath and NewPath variables
  8. Type output into the bottom box
  9. Click ok
  10. Save your edits

Monday, March 30, 2009

ArcPad Tips & Tricks #2: Multiple layer definitions

Did you know that the AXF file format supports multiple layer definitions for a single feature class? This works in the same way as Layer files in ArcMap: the layer defines the symbology, which points to a feature class, which stores all of the data (both spatial and attributes). To set this up in ArcPad:
  1. Open the AXF in ArcPad studio
  2. Expand the Feature Tables node
  3. Right click on the table you wish to create the layer definition for, and select "Create New Layer". A new layer definition is added to the Feature Layers node
  4. You can rename the layer to whatever you like

And how is this useful I hear you ask. Well, a couple of ideas are:

  1. You could create different edit forms for different purposes. For example, you may have a layer for new features that are collected, and one for follow up inspections. You can specify different forms to ensure the correct fields are filled out in each inspection.
  2. You can combine the layer definitions with filters to create more complex symbology. For example, you may wish to categorise your roads layer into suburban roads, major roads and highways, and display them at different zoom scales.

Wednesday, March 25, 2009

ArcPad Tips & Tricks #1: Layer Icons


Did you know that you can set icons for your layers. These will appear in the Table of Contents and the Edit drop down menu, making it easier to differentiate between your layers.


For shapefiles, all you need to do is copy a .ico file, with the same base name as the shapefile, into the same directory. So, for example, if your shapefile is Roads.shp, name you .ico file Roads.ico.

The process is a bit more complicated with AXF files. You need to open up the axf in Application Builder, right click the layer and select "Set Layer Icon". You can clear the icon by selecting "Clear Layer Icon".

A good selection of sample icons can be found in C:\Program Files\ArcPad 7.1\Samples\Layer Icons. If you want to make your own, a good program is IcoFX. Your icons need to be 4bit 16x16 images.

Friday, February 27, 2009

ArcPad 8 is on its way!


ESRI has announced that ArcPad 8 will be released in the first quater of 2009. The new version will see an entirely revamped user interface, featureing an Office 2007 type feel with ribbons and quick launch toolbars. As a bonus, ArcPad Application Builder, the development framework for ArcPad, will be included with every ArcPad 8 license.

Other highlights of the new release include:
  • An ArcGIS Server Extension to allow direct synchronisation to ArcGIS Server from ArcPad
  • An improved, more intuitive GPS interface that takes up less screen real estate
  • An enhanced ArcPad Data Manager Extension, which will simplify the process of checking data out and in of the Geodatabase.
If you have any questions at all about the new release, training (for both ArcPad and Application Builder), give us a call on 03 6223 4919.


Stay tuned for further updates regarding the release date and pricing structure.